Why should you want to create your own Web Content Management System (WCMS) – there are already hundreds of them?! Completely correct, and there is also no real reason to do something so time-intensive – unless, of course, you are not quite satisfied with what exists and/or simply want to know and try out for yourself how to approach such a thing. Exactly with this motivation – and the original intention of developing a new layout for my personal website – I created my own WCMS within one month: nCMS – "niklas stephan's Content Management System", or also "node-red Content Management System" or "not another Content Management System"!
What is nCMS and what can it do?
nCMS is a flat-file and headless web content management system. That means, unlike e.g. WordPress, it works without a database and consists of files. nCMS is based in the backend on Node-RED and Node.js JavaScript functions developed within it.
Changes to nCMS's code are written through deployments in Node-RED, and the changes to files are synchronized and versioned via Git in GitHub. Changes to content such as new posts are likewise started via deployments – manually or as a webhook. All files are then generated and provided to a web server as static files. That means retrieving the content via a website built with nCMS is lightning fast. Creating individual blog posts happens in markup syntax in any text editor.
Further features integrated so far are:
- Multi-language support for blog posts and all pages
- Comment function in the blog posts
- Media management via simple file upload
- Template- and snippet-based creation of the HTML skeleton
- Explicitly no use of frontend frameworks like Vue or Angular, but pure "vanilla" JavaScript
- Automatic generation of meta data for social media integration and SEO
- Full-text search based on an automatically generated local index
- Release function of posts via a "published" attribute
And many more, documented in the project's GitHub repository: https://github.com/handtrixx/ncms
Faster, tidier and simpler than WordPress and others?
Yes, yes, yes. Exactly how, I explain here.
Fast
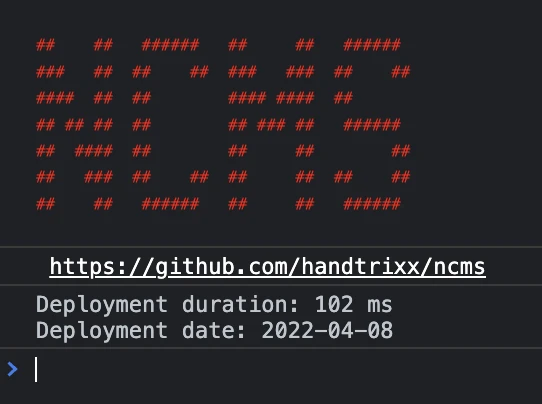
In the backend – a deployment (creating the static files for the web server) takes between 70 and 320 milliseconds.
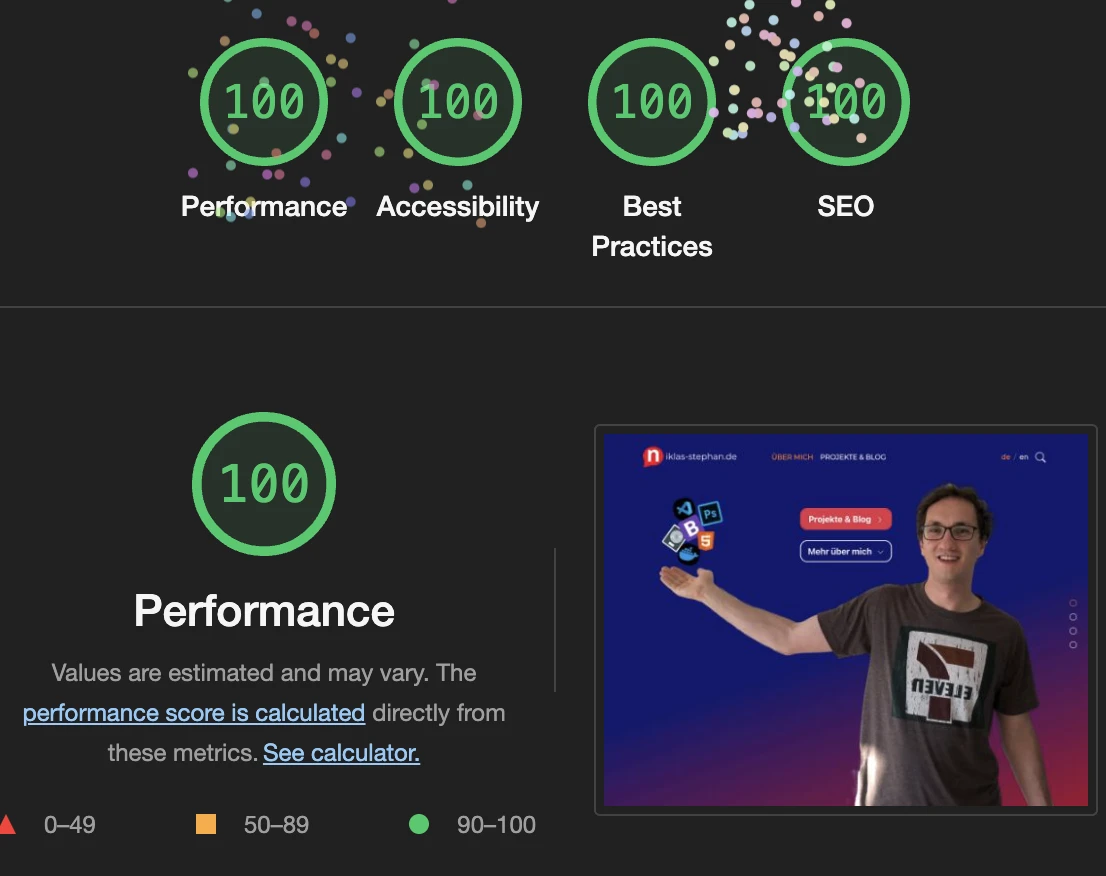
In the frontend – e.g. the start page is only 670 KB large despite all animations, effects and images, and can be fully loaded by the client in between 100 and 300 milliseconds.

Tidy
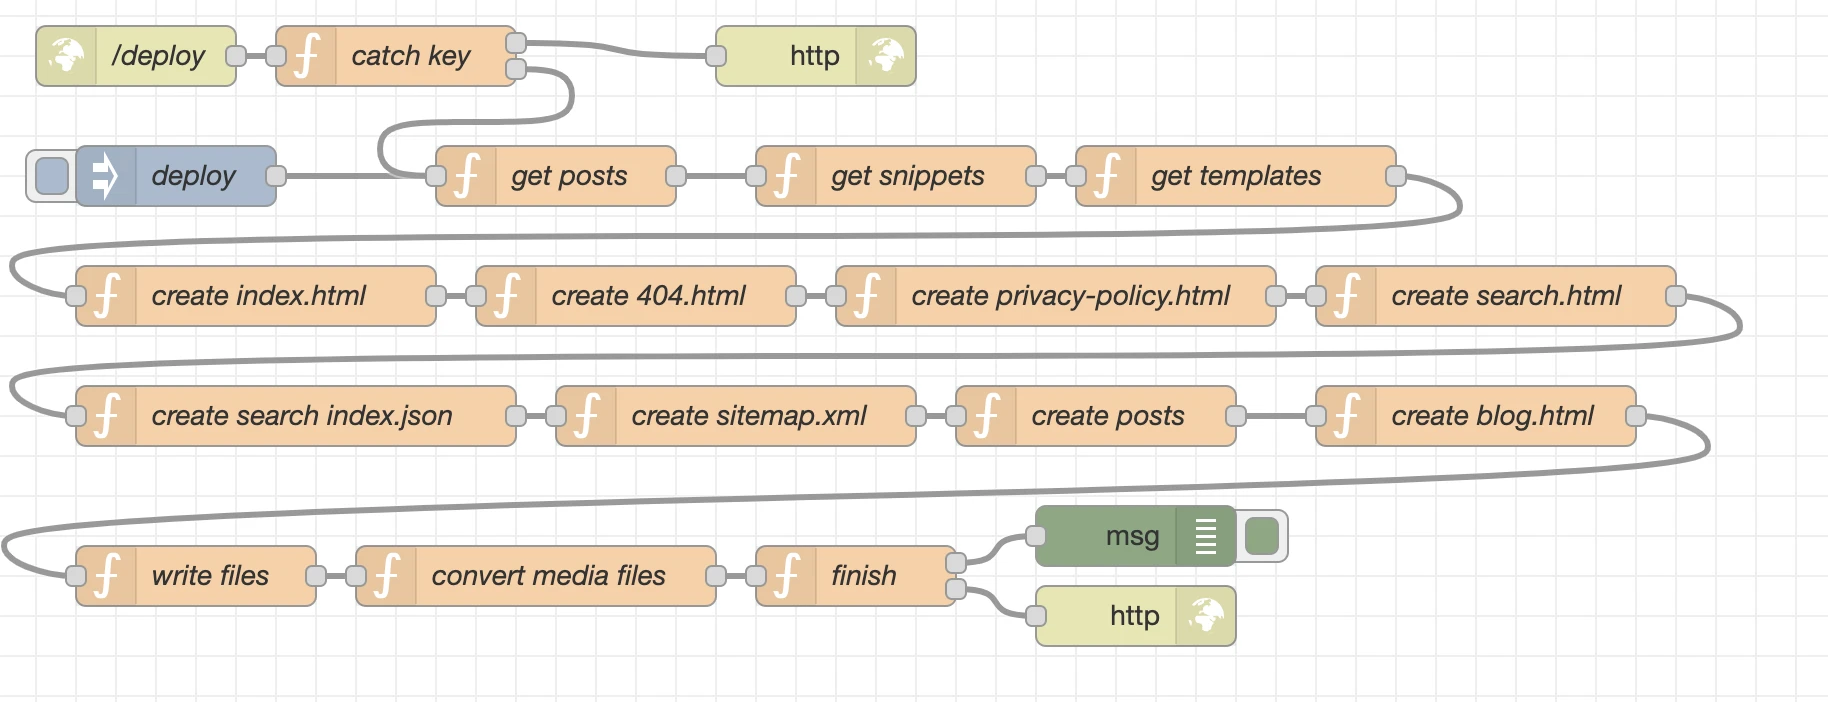
In the backend: The use of Node-RED gives a graphical overview and thus ensures that we don't lose track. More on that later.
In the frontend: Through foregoing JavaScript frameworks and the simplicity of the system itself, we are rewarded with clean HTML code at delivery. For https://niklas-stephan.de I did fall back on Bootstrap 5's HTML5 skeleton for the frontend UI, but that no longer weighs heavily, and nowadays in the standard it likewise gets along without the bloated jQuery framework.
Simple
In the backend: Assets, media, templates and snippets are provided via Visual Studio Code or another text editor + file manager. In Node-RED all this is assembled, extended with functionalities through JavaScript code and Node.js modules, and the final result is finally provided in the form of static files in a directory on an nginx web server. That is the core of nCMS.
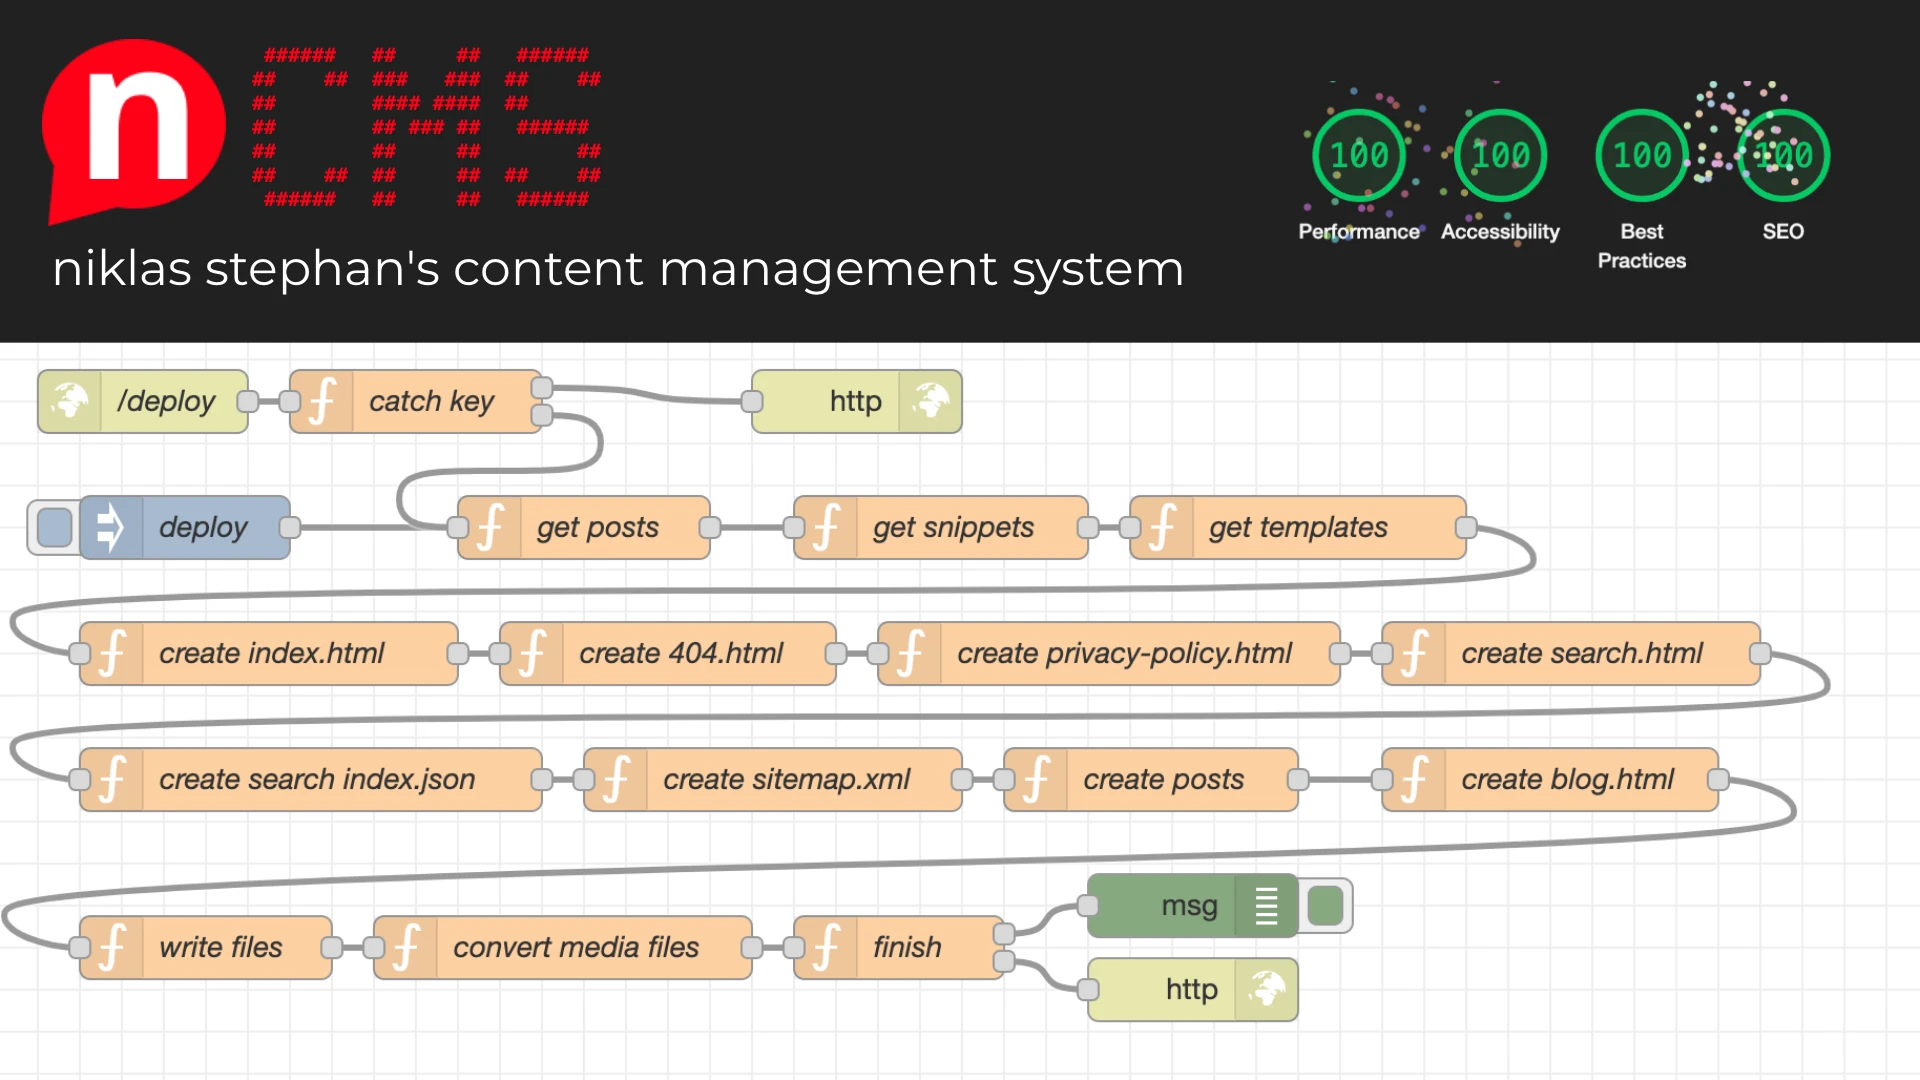
In the frontend: The choice between German and English happens either automatically or is set manually. There is a start page, a page for search, a page for privacy policy and imprint, a page for intercepting invalid calls, and a page with the overview over all posts. Of course the complete UI is optimized for display on all device types.
Behind the scenes
The complete build of nCMS happens in a Docker Compose environment. All files from the volume src also lie on https://github.com/handtrixx/ncms.
Here my example configuration based on the official Node-RED image from Docker Hub (https://hub.docker.com/r/nodered/node-red):
services:
  ncms:
    container_name: ncms
    hostname: ncms
    image: nodered/node-red:latest
    restart: always
    environment:
      - TZ=Europe/Berlin
    networks:
      - dmz
    logging:
      options:
        max-size: "10m"
        max-file: "3"
    volumes:
      - ./data:/data
      - ./dist:/dist:rw
      - ./src:/src:rw
      - /etc/localtime:/etc/localtime:ro

networks:
  dmz:
    external: true
Actually only the network configuration and the different volumes need explanation. As also in my other posts on Matomo, BOINC and others, on my cloud server I use a reverse proxy based on the Nginx Proxy Manager (https://hub.docker.com/r/jc21/nginx-proxy-manager). The volume/directory ./dist is likewise linked in my reverse proxy via an ln -s, so that you don't have to do double deployments and another web server remains obsolete. Node-RED itself, i.e. the backend, is reachable via its own subdomain.
Directory structure
In the directory ./src there are the following subfolders:
- assets
- css
- fonts
- img
- js
- json
- md
- posts
- media
- x
- snippets
- templates
Into the assets directory and its subfolders belong all files repeatedly needed in the frontend, such as e.g. CSS and JavaScript from Bootstrap 5 (https://getbootstrap.com/), but of course above all also own stylesheets and JavaScript functions. In the subfolder json we lay out our static translation keys.
The folder md, in its subfolder posts, obviously contains all our posts written in markup, which are also recognizable by their file extension .md.
Into the media directory and at most one subfolder level deep we can "throw" all images we want to use in our posts. These are then automatically converted during the deployment into the space-saving .webp format and a thumbnail is generated for each image.
In the folder snippets we have laid all HTML elements that we repeatedly need on all pages.
Analogously, in the templates directory lie the source files of our frontend, which are enriched with content during the deployment.
All this can also be transparently followed in the GitHub project at https://github.com/handtrixx/ncms.
Templates
In the templates directory there are the following files:
404.html– the error page that is always shown when an invalid query is made to the websiteblog.html– the page that provides the overview over all postsindex.html– the start page with its contentspost.html– the template from which the individual post pages are renderedprivacy-policy.html– the page on privacy policy and imprint, linked in the footer and thus reachable from everywhere and required to berobots.txt– info for the crawlers of search enginessearch.html– my page on which you can search and which provides all search results without a query at the server via a JSON index
Snippets
The snippets that are later smuggled into all HTML templates in the deployment are footer.html, head.html, navbar.html, script.html. Through the division into these snippets we have the massive advantage that, in the case of a desired adjustment – e.g. in the navigation menu – we have to perform it exactly once to change it on all pages.
Program logic with Node.js and Node-RED
Node-RED is based on Node.js and allows us, in a kind of flow diagram, to connect various elements and functions with each other. That is called a "flow" in Node-RED. In nCMS I also only use this basic functionality of Node-RED and no further plugins from the palette. Instead I load Node.js packages in the various nodes to extend the functional range of the system.
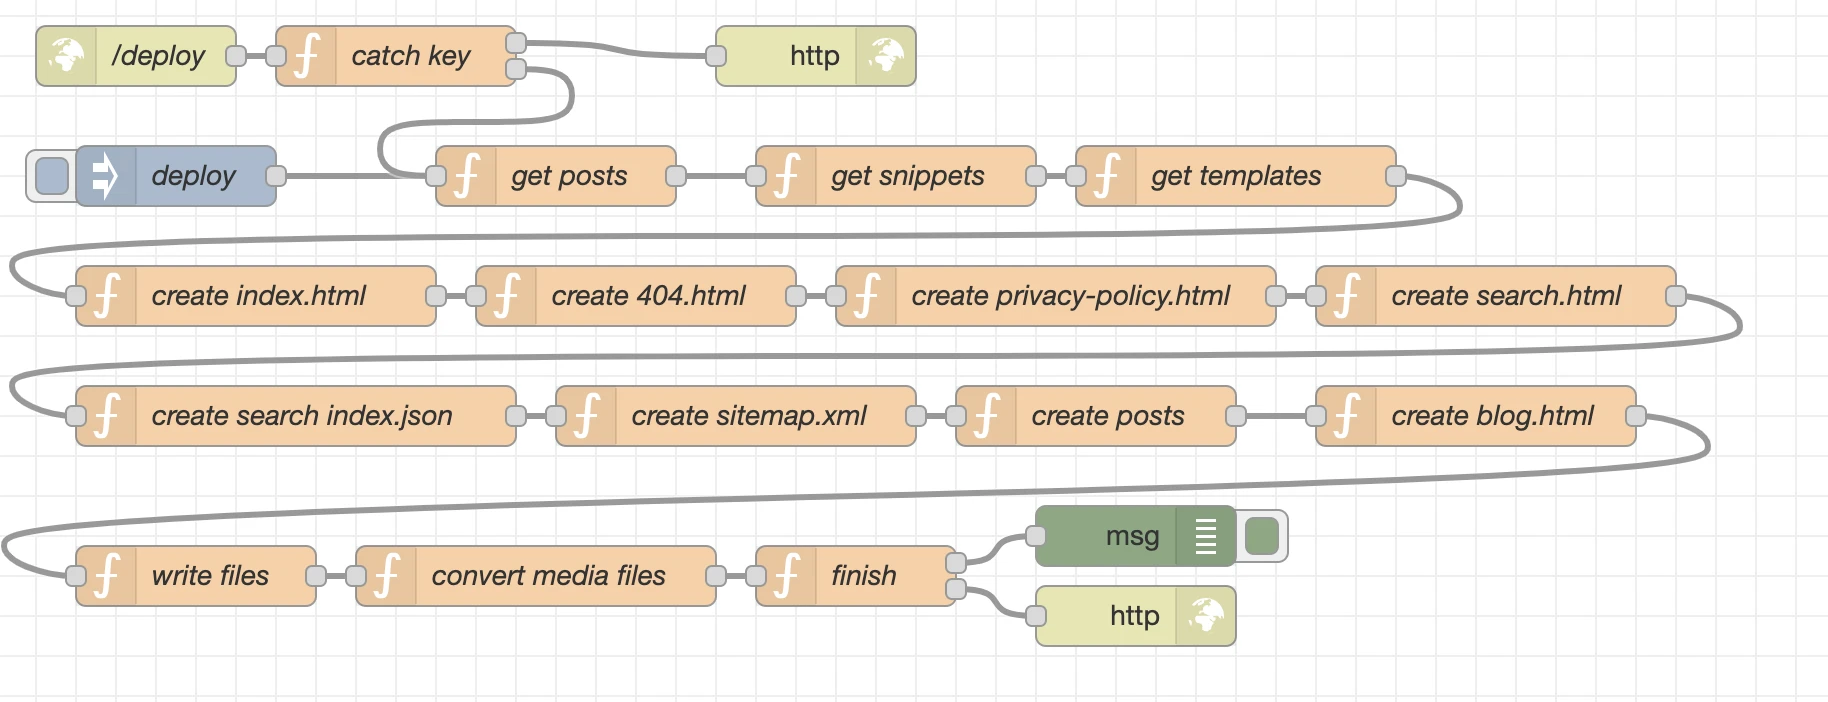
In the following an explanation of the individual nodes.
/deploy
This is a listening http in node, to start a deployment by a webhook. E.g. curl -X POST -d 'key=----' https://ncms.niklas-stephan.de/deploy starts the deployment.
catch key
Naturally not simply everyone should be able to start a deployment, therefore a small security check in the catch key node.
In the node under "Setup" the npm module fs-extra is loaded and provided as fse, so that we have access to the file system and can compare the key kept in the folder /data with the one provided to us for the deployment in the webhook.
The function itself then looks like this:
const transferedKey = msg.payload.key;
const systemKey = fse.readFileSync('/data/deploy.key', 'utf8')

if (transferedKey == systemKey) {
    msg.payload = "Deployment Started";
    msg.statusCode = 200;
    msg.type = "webhook";
    msg.starttime = Date.now();
    return [null,msg];
} else {
    msg.payload = "Wrong authentication!"
    msg.statusCode = 400;
    return [msg,null];
}
This node also has 2 outputs. If the two keys match, the deployment continues – output 2. But if not, an error message is passed to output 1 and the deployment is thus aborted.
deploy
Starts the deployment likewise, but manually via the Node-RED interface and not as a webhook.
get posts
In this node we load the content of all posts from the *.md files and store it as objects in an array for later use. Besides the fs-extra module we also make intensive use of the module markdown-it and plugins for it. markdown-it (https://github.com/markdown-it/markdown-it) helps us convert the content from markup to HTML.
msg.baseurl = "https://niklas-stephan.de"
msg.dist = {};
msg.posts = [];
const path = '/src/md/posts/';
const postfiles = fse.readdirSync(path)
const alength = postfiles.length;

for (var i=0; i<alength; i++) {
    var srcFile = path+postfiles[i];
    var distFilename = postfiles[i].split('.')[0]+".html";
    var srcContent = fse.readFileSync(srcFile, 'utf8')

    var md = new markdownIt({
        html: true,linkify: true,typographer: true,breaks: true})
        .use(markdownItFrontMatter, function(metainfo) {meta = JSON.parse(metainfo);})
        .use(markdownItLinkifyImages, {target: '_blank',linkClass: 'custom-link-class',imgClass: 'custom-img-class'})
        .use(markdownItLinkAttributes, { attrs: {target: "_blank",rel: "noopener",}
    });

    distContent = md.render(srcContent);

    let data = {"srcFile":""+srcFile+"","srcContent":""+srcContent+"","distContent":""+distContent+"","distFilename":""+distFilename+"",...meta};

    msg.posts.push(data)
}

return msg;
get snippets
Via the npm module fs-extra we load the content of our snippets and store them as array msg.snippets, so that we can access them later in the flow.
msg.snippets = {};
const path = '/src/snippets/';
const files = fse.readdirSync(path)
const alength = files.length;

for (var i=0; i<alength; i++) {
    var srcFile = path+files[i];
    var srcContent = fse.readFileSync(srcFile, 'utf8')

    msg.snippets[files[i]] = srcContent;
}

return msg;
get templates
Just like the snippets, we also store the content of the templates in our flow for later use.
msg.templates = {};
const path = '/src/templates/';
const files = fse.readdirSync(path)
const alength = files.length;

for (var i=0; i<alength; i++) {
    var srcFile = path+files[i];
    var srcContent = fse.readFileSync(srcFile, 'utf8')

    msg.templates[files[i]] = srcContent;
}

return msg;
create index.html
Now we begin generating the contents of the individual files; our index.html file makes the start. The upper half of the code concerns generating the meta tags for social media and search engines. In the second block we insert the snippet values, the page title, and the metadata into the placeholders of the template. Ultimately our finished index.html stands ready as object msg.dist.index in our flow to later be written as a file.
msg.dist.index = "";
var ogmetalang = "de_DE";
var ogmeta = `
<meta property="og:type" content="website">
<meta property="og:locale" content="`+ogmetalang+`">
<meta property="og:site_name" content="niklas-stephan.de">
<link rel="canonical" href="`+msg.baseurl+`/index.html">
<meta name="description" content="Projekte und Posts aus der Welt von IoT, Musik und mehr">
<meta property="og:title" content="Projects & Blog - niklas-stephan.de">
<meta property="og:description" content="Projekte und Posts aus der Welt von IoT, Musik und mehr">
<meta property="og:url" content="`+msg.baseurl+`/index.html">
<meta property="og:image" content="`+msg.baseurl+`/assets/img/me_logo.webp">
<meta property="og:image:secure_url" content="`+msg.baseurl+`/assets/img/me_logo.webp">
<meta name="twitter:card" content="summary">
<meta name="twitter:description" content="Projekte und Posts aus der Welt von IoT, Musik und mehr">
<meta name="twitter:title" content="Projects & Blog - niklas-stephan.de">
<meta name="twitter:image" content="`+msg.baseurl+`/assets/img/me_logo.webp">`

msg.dist.index = msg.templates["index.html"].replace("<!-- html head from head.html snipppet -->",msg.snippets["head.html"]);
msg.dist.index = msg.dist.index.replace("<!-- Top Navigation from navbar.html snipppet -->",msg.snippets["navbar.html"]);
msg.dist.index = msg.dist.index.replace("<!-- footer navigation from footer.html snipppet -->",msg.snippets["footer.html"]);
msg.dist.index = msg.dist.index.replace("<!-- Javascript from script.html snipppet -->",msg.snippets["script.html"]);
msg.dist.index = msg.dist.index.replace("<!-- PAGE TITLE -->","Home");
msg.dist.index = msg.dist.index.replace("<!-- meta tags -->",ogmeta);

return msg;
create 404.html
The 404.html is quickly assembled. We insert all snippets into our template and give the page a name. Finally our object stands available as msg.dist.errorpage.
create privacy-policy.html
Just as much a "low-brainer" is the page with privacy policy and imprint, quickly prepared as msg.dist.privacy.
msg.dist.privacy = "";

msg.dist.privacy = msg.templates["privacy-policy.html"].replace("<!-- html head from head.html snipppet -->",msg.snippets["head.html"]);
msg.dist.privacy = msg.dist.privacy.replace("<!-- Top Navigation from navbar.html snipppet -->",msg.snippets["navbar.html"]);
msg.dist.privacy = msg.dist.privacy.replace("<!-- footer navigation from footer.html snipppet -->",msg.snippets["footer.html"]);
msg.dist.privacy = msg.dist.privacy.replace("<!-- Javascript from script.html snipppet -->",msg.snippets["script.html"]);
msg.dist.privacy = msg.dist.privacy.replace("<!-- PAGE TITLE -->","Datenschutz & Impressum");

return msg;
create search.html
Before it gets a little more complicated again, first the simple creation of the object msg.dist.search for later use.
msg.dist.search = "";

msg.dist.search = msg.templates["search.html"].replace("<!-- html head from head.html snipppet -->",msg.snippets["head.html"]);
msg.dist.search = msg.dist.search.replace("<!-- Top Navigation from navbar.html snipppet -->",msg.snippets["navbar.html"]);
msg.dist.search = msg.dist.search.replace("<!-- footer navigation from footer.html snipppet -->",msg.snippets["footer.html"]);
msg.dist.search = msg.dist.search.replace("<!-- Javascript from script.html snipppet -->",msg.snippets["script.html"]);
msg.dist.search = msg.dist.search.replace("<!-- PAGE TITLE -->","Suche");

return msg;
create search index.json
To build the search index that later enables a search without making a query at the server, I use a for loop that runs through all elements in the array msg.posts and generates an entry in the index as a JSON object for each post. Ultimately the index is provided as object msg.dist.searchindex.
var alength = msg.posts.length;
var index = "[";

for (var i=0; i<alength; i++) {
    index = index+`{"lang":"`+msg.posts[i].language+`","link":"/posts/`+msg.posts[i].distFilename+`","headline":"`+msg.posts[i].title+`","content":"`+msg.posts[i].distContent.replace(/[^a-zA-Z0-9]/g, ' ')+`"},`;
}
index = index.slice(0, -1);
index = index+"]";

msg.dist.searchindex = index;

return msg;
create sitemap.xml
When generating the sitemap we proceed similarly to the search index. Instead of a classic for loop I use the JavaScript forEach() function, which in the end accomplishes the same thing, just somewhat more modern.
var xml = `<?xml version="1.0" encoding="UTF-8"?>
<urlset xmlns="http://www.sitemaps.org/schemas/sitemap/0.9" xmlns:xsi="http://www.w3.org/2001/XMLSchema-instance" xsi:schemaLocation="http://www.sitemaps.org/schemas/sitemap/0.9 http://www.sitemaps.org/schemas/sitemap/0.9/sitemap.xsd">
    <url>
        <loc>`+msg.baseurl+`/</loc>
        <priority>1.00</priority>
    </url>
    <url>
        <loc>`+msg.baseurl+`/index.html</loc>
        <priority>0.80</priority>
    </url>
    <url>
        <loc>`+msg.baseurl+`/blog.html</loc>
        <priority>0.80</priority>
    </url>`

msg.posts.forEach(postxml);

xml = xml + `
</urlset>`
msg.dist.sitemap = xml;
return msg;

function postxml(item) {
     if (item.published == true ) {
        xml = xml + `
        <url>
            <loc>`+msg.baseurl+`/posts/`+item.distFilename+`.html</loc>
            <priority>0.64</priority>
        </url>`
     }
}
create posts
We already converted and provided the content of the individual posts in the array msg.posts in the get posts node. Now we want to finalize this insofar that, analogously to the previously created files, we can also create a single file for each post, and again lay this out as object in the object msg.dist.posts.
msg.dist.posts = {};
var alength = msg.posts.length;
var data = "";
var ogmetalang = "";
var ogmeta = "";
var postdate = "";

for (var i=0; i<alength; i++) {

    if (msg.posts[i].language == "de") {
       ogmetalang = "de_DE"
    } else {
        ogmetalang = "en_US"
    }

    img = msg.posts[i].imgurl.split('.')[0]+".webp";

    ogmeta = `
    <meta property="og:type" content="website">
    <meta property="og:locale" content="`+ogmetalang+`">
    <meta property="og:site_name" content="niklas-stephan.de">
    <link rel="canonical" href="`+msg.baseurl+`/posts/`+msg.posts[i].language+`/`+msg.posts[i].distFilename+`">
    <meta name="description" content="`+msg.posts[i].excerpt+`">
    <meta property="og:title" content="`+msg.posts[i].title+`">
    <meta property="og:description" content="`+msg.posts[i].excerpt+`">
    <meta property="og:url" content="`+msg.baseurl+`/posts/`+msg.posts[i].language+`/`+msg.posts[i].distFilename+`">
    <meta property="og:image" content="`+msg.baseurl+`/media/full/`+img+`">
    <meta property="og:image:secure_url" content="`+msg.baseurl+`/media/full/`+img+`">
    <meta name="twitter:card" content="summary">
    <meta name="twitter:description" content="`+msg.posts[i].excerpt+`">
    <meta name="twitter:title" content="`+msg.posts[i].title+`">
    <meta name="twitter:image" content="`+msg.baseurl+`/media/full/`+img+`">`

    postdate = '<small class="c-gray pb-3" id="postdate">'+msg.posts[i].date+'</small>';

    data = "";
    data = msg.templates["post.html"];

    data = data.replace("<!-- html head from head.html snipppet -->",msg.snippets["head.html"]);
    data = data.replace("<!-- Top Navigation from navbar.html snipppet -->",msg.snippets["navbar.html"]);
    data = data.replace("<!-- footer navigation from footer.html snipppet -->",msg.snippets["footer.html"]);
    data = data.replace("<!-- Javascript from script.html snipppet -->",msg.snippets["script.html"]);

    data = data.replace("<!-- mardown content from posts -->",msg.posts[i].distContent);
    data = data.replace("<!-- Post Headline -->", msg.posts[i].title);
    data = data.replace("<!-- postdate -->", postdate);
    data = data.replace("<!-- Post Image -->", '<img src="/media/thumb/'+img+'" class="img-fluid mb-2" alt="postImage">');
    data = data.replace("<!-- PAGE TITLE -->",msg.posts[i].title);
    data = data.replace("<!-- meta tags -->",ogmeta);

    msg.dist.posts[msg.posts[i].distFilename] = data;
}

return msg;
create blog.html
Now our last preparative trick: the generation of the overview of all posts in the object msg.dist.blog. From the scope of the function it is apparent that something more happens here than in the other files.
First we collect all defined categories from the individual posts via a for loop, then delete values present twice from the generated array. We need that so that the visitors of our website can later filter via categories. Each category is additionally assigned a unique color, which corresponds to a CSS class in our stylesheet.
Next we still extract title, short description, date and image from the post metadata. During this for loop an if condition prevents us from preparing unpublished posts for selection.
Finally we generate the corresponding HTML code from the determined values, insert the snippet data, supplement the meta information for the page, and write the whole thing into the object msg.dist.blog.
//get categories from all posts and extract unique ones

var categories = [];
for (var i=0 ; i<msg.posts.length;i++) {
    if (msg.posts[i].published == true) {
        for (var j = 0; j < msg.posts[i].keywords.length; j++) {
            categories.push(msg.posts[i].keywords[j]);
        }
    }
}
var uniqueCategories = [...new Set(categories)];

// define a color to stick for each category

const colorcat = {};
var catcolors = ["green", "red", "blue", "orange", "yellow", "pink", "purple","indigo"];
var c=0;
 for (const key of uniqueCategories) {
      colorcat[key] = catcolors[c];
      c = c+1;
 }

//generate and set html for categorie selection

var cathtml = "";
for (var k = 0; k < uniqueCategories.length; k++) {

    cathtml = cathtml + `<button data-filter=".cat-`+uniqueCategories[k]+`" type="button"
    onclick="sort()" class="btn bg-` + catcolors[k] + ` c-white me-2">` + uniqueCategories[k]+`</button>`;
}
msg.dist.blog = msg.templates["blog.html"].replace("<!-- CATEGORIES -->", cathtml);

// get card content from all posts and generate html

var posthtml = "";
for (var l = 0; l < msg.posts.length; l++) {
    if (msg.posts[l].published == true) {

    var link = msg.posts[l].filename.slice(0, -3)+".html";

    //get color for current post
    var postcolor = "";
    for (const key in colorcat) {
        if (key == msg.posts[l].keywords[0]) {
            postcolor = colorcat[key];
        }
    }

    imgurl = msg.posts[l].imgurl.split('.')[0]+".webp";

    posthtml = posthtml + `
    <div class="col-sm-6 col-lg-4 my-4 filterDiv cat-`+msg.posts[l].keywords[0]+` lang-`+ msg.posts[l].language + `">
        <span class="date hidden d-none">`+ msg.posts[l].date + `</span>
        <span class="name hidden d-none">`+ msg.posts[l].title + `</span>
        <div onclick="goto('`+ link+ `','blog')" class="card h-100 d-flex align-items-center bo-`+postcolor+`">
            <div class="card-header bg-`+ postcolor + `">` + msg.posts[l].keywords[0] + `</div>
            <div class="card-img-wrapper d-flex align-items-center">
                <img src="media/thumb/`+ imgurl + `"
                    class="card-img-top" alt="iot">
            </div>
            <div class="card-body">
                <h5 class="card-title">`+ msg.posts[l].title + `</h5>
                <p class="card-text">
                    `+ msg.posts[l].excerpt + `
                </p>
            </div>
            <div class="card-footer small text-center c-gray pdate">
                `+msg.posts[l].date+`
            </div>
        </div>
    </div>
    `;
    }
}

msg.dist.blog = msg.dist.blog.replace("<!-- POSTS -->", posthtml);

var ogmetalang = "de_DE";
var ogmeta = `
<meta property="og:type" content="website">
<meta property="og:locale" content="`+ogmetalang+`">
<meta property="og:site_name" content="niklas-stephan.de">
<link rel="canonical" href="`+msg.baseurl+`/blog.html">
<meta name="description" content="Projekte und Posts aus der Welt von IoT, Musik und mehr">
<meta property="og:title" content="Projects & Blog - niklas-stephan.de">
<meta property="og:description" content="Projekte und Posts aus der Welt von IoT, Musik und mehr">
<meta property="og:url" content="`+msg.baseurl+`/blog.html">
<meta property="og:image" content="`+msg.baseurl+`/assets/img/me_logo.webp">
<meta property="og:image:secure_url" content="`+msg.baseurl+`/assets/img/me_logo.webp">
<meta name="twitter:card" content="summary">
<meta name="twitter:description" content="Projekte und Posts aus der Welt von IoT, Musik und mehr">
<meta name="twitter:title" content="Projects & Blog - niklas-stephan.de">
<meta name="twitter:image" content="`+msg.baseurl+`/assets/img/me_logo.webp">`

msg.dist.blog = msg.dist.blog.replace("<!-- meta tags -->",ogmeta);
msg.dist.blog = msg.dist.blog.replace("<!-- html head from head.html snipppet -->",msg.snippets["head.html"]);
msg.dist.blog = msg.dist.blog.replace("<!-- Top Navigation from navbar.html snipppet -->",msg.snippets["navbar.html"]);
msg.dist.blog = msg.dist.blog.replace("<!-- footer navigation from footer.html snipppet -->",msg.snippets["footer.html"]);
msg.dist.blog = msg.dist.blog.replace("<!-- Javascript from script.html snipppet -->",msg.snippets["script.html"]);
msg.dist.blog = msg.dist.blog.replace("<!-- PAGE TITLE -->","Projekte & Blog");

return msg;
write files
Now we finally want to write our laboriously generated objects in msg.dist down as real files. In our "write files" function we again bind the npm module fs-extra as fse for that.
All generated files should land in the directory /dist/. At the same time we want to delete all traces of previous deployments, so that "file ghosts" and similar don't lead us to inconsistencies.
The await prefixed to the fse functions ensures a sequential execution of the individual steps by waiting until the respective call is completely finished. So in the function the directory /dist is completely emptied in the first step, and then all needed subfolders are created empty again.
Next we copy our assets from /src/assets/ to /dist/assets/ and do the same with the robots.txt file.
Subsequently we write the contents of the objects in msg.dist down into the respective file, in order to then go in a loop through all posts and likewise write them into the file system.
await fse.emptyDir('/dist').then(() => {
    fse.mkdirSync('/dist/media');
    fse.mkdirSync('/dist/media/full');
    fse.mkdirSync('/dist/media/thumb');
    fse.mkdirSync('/dist/posts');
});

await fse.copySync('/src/assets/', '/dist/assets/');
await fse.copySync('/src/templates/robots.txt', '/dist/robots.txt');

await fse.writeFileSync('/dist/index.html', msg.dist.index);
await fse.writeFileSync('/dist/blog.html', msg.dist.blog);
await fse.writeFileSync('/dist/404.html', msg.dist.errorpage);
await fse.writeFileSync('/dist/privacy-policy.html', msg.dist.privacy);
await fse.writeFileSync('/dist/search.html', msg.dist.search);
await fse.writeFileSync('/dist/sitemap.xml', msg.dist.sitemap);
await fse.writeFileSync('/dist/searchindex.json', msg.dist.searchindex);

const postfilefolder = "/dist/posts/"

await Object.entries(msg.dist.posts).forEach(item => {
  var [key, value] = item;
  fse.writeFileSync(postfilefolder+key, value)
});

return msg;
convert media files
Somewhat more complex still is the generation of the media files. We want to convert the files from the directory /src/media/ and one subfolder level deep into the memory-saving .webp format and additionally generate a thumbnail in lower resolution for each. Besides we want only media with the source formats .jpg, .jpeg, .png or .gif to be converted. All other files are copied directly to /dist/media/full/ without change. To make the work easier for us we fall back on the npm modules fs-extra as fse and sharp.
Note also that I deliberately spare out the await command at the generation of the files, so that the loops already start with the next file from their arrays before the write operation is completed. That accelerates the deployment by a very large factor – at the small risk, or accepted circumstance, that a media file is not yet written/available when the deployment is completed.
var srcpath = '/src/media/';
var fullpath = '/dist/media/full/';
var thumbpath = '/dist/media/thumb/';
const filetypes = ["jpg", "jpeg", "png", "gif", "webp"];
const mediafiles = fse.readdirSync(srcpath);
const alength = mediafiles.length;
var mediafile = "";
var targetfile = "";

for (var i=0; i<alength; i++) {
    mediafile = mediafiles[i];

    if (mediafile.includes(".")) {
        targetfile = mediafile.split('.')[0];
        if (filetypes.includes(mediafile.split('.')[1]) ) {
            sharp(srcpath+mediafile)
            .toFile(fullpath+targetfile+'.webp');
            sharp(srcpath+mediafile).resize({ width: 440 })
            .toFile(thumbpath+targetfile+'.webp');
        } else {
            fse.copySync(srcpath+mediafile, fullpath+mediafile)
        }

    } else {
        var subsrcpath = srcpath+mediafile+"/";
        var subfullpath = fullpath+mediafile+"/";
        var subthumbpath = thumbpath+mediafile+"/";
        var submediafiles = fse.readdirSync(subsrcpath);
        var blength = submediafiles.length;
        await fse.mkdirSync(subfullpath);
        await fse.mkdirSync(subthumbpath);

        for (var j=0; j<blength; j++) {
            submediafile = submediafiles[j];
            subtargetfile = submediafile.split('.')[0];

            if (filetypes.includes(submediafile.split('.')[1]) ) {
                sharp(subsrcpath+submediafile)
                .toFile(subfullpath+subtargetfile+'.webp');

                sharp(subsrcpath+submediafile).resize({ width: 440 })
                .toFile(subthumbpath+subtargetfile+'.webp');
            } else {
                fse.copySync(subsrcpath+submediafile, subfullpath+submediafile)
            }
        }
    }
}

return msg;
finish
Our deployment approaches the end. We still calculate the duration of the deployment and set a timestamp to record this information in the file /dist/deploy.log. The file is then again written with the npm module fs-extra as fse. Depending on the trigger of the deployment – i.e. manual vs. webhook – it is finally forwarded to a debug node or to the debug node and an http-out node.
var endtime = Date.now();
var duration = endtime-msg.starttime;
duration = duration;
let yourDate = new Date()
var depdate = yourDate.toISOString();

var log = "Deployment duration: "+duration+" ms \n";
log = log+"Deployment timestamp: "+depdate;
msg.statusCode = 200;

fse.writeFileSync('/dist/deploy.log', log);
msg.payload = log;

if (msg.type != "manual") {
    return [msg,msg];
} else {
    return [msg,null];
}
msg & http
Done! The two nodes msg and http serve the clean conclusion of our deployment. The "http out" node returns the previously defined body as message to the calling webhook.

The "msg" debug node shows us the complete content of the deployment in Node-RED's debugger, when activated.
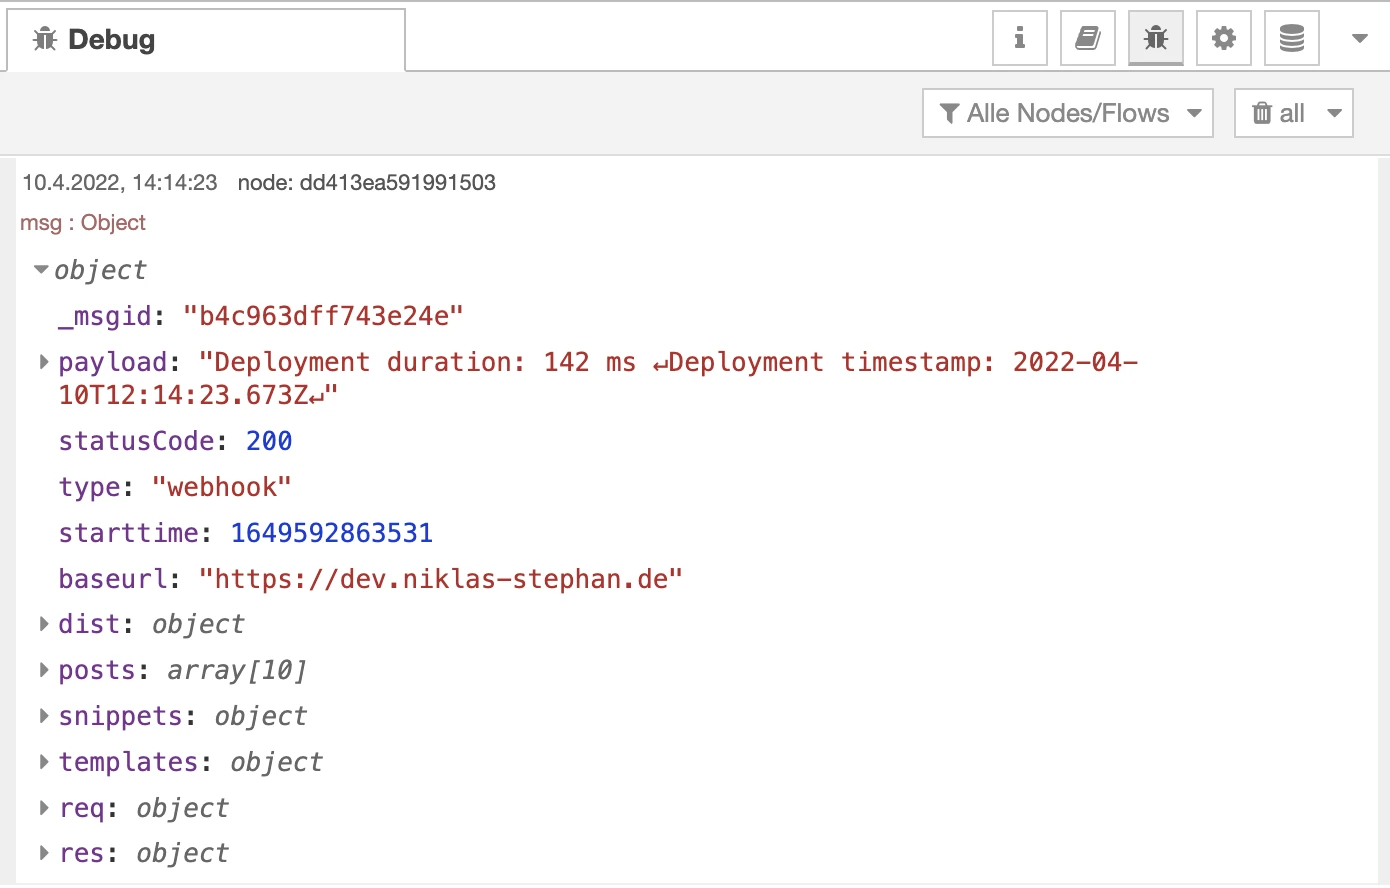
You can also download the complete Node-RED flow here: https://niklas-stephan.de/media/orig/ncms/flow.json (version 0.60).
Conclusion
Admittedly, had I used a stopwatch to record how long the development of nCMS took, perhaps I would have aborted at some point. But: from start to end of the project – quite like in a turn-based strategy game – the "just this one thing more" moment was regularly there. It also made a lot of fun to develop ever more sophisticated JavaScript functions with the help of Node-RED. The firmly integrated debugger was here almost as big a help as the possibility, in Node-RED JavaScript functions, to access further Node.js modules maximally easily. If you ever want to implement a similar endeavor, feel free to fork my sources on GitHub.
Of course there are also some weaknesses worth improving.
For example at the places where I reference the frontend in the Node-RED backend. That makes the whole thing somewhat less flexible, because if really someone wants to use my sources, they would still have to work their way into the frontend accordingly.
And in general I did not go further into the HTML5 frontend with JavaScript functions, CSS and HTML in this article.
Perhaps that follows some other time.
Sources / Further links
Here again all sources, links and files from the article listed together:
- The sources of nCMS at GitHub: https://github.com/handtrixx/ncms
- The Node-RED flow of nCMS: https://niklas-stephan.de/media/full/ncms/ncms_flow.json
- The fantastic Node-RED: https://nodered.org/
- Node-RED as container at Docker Hub: https://hub.docker.com/r/nodered/node-red
- Nginx Proxy Manager: https://nginxproxymanager.com/
- Twitter's renowned Bootstrap HTML5 template: https://getbootstrap.com/
- markdown-it – from markup to HTML, simply: https://markdown-it.github.io/
- File system operations in Node.js with fs-extra: https://github.com/jprichardson/node-fs-extra
- Lightning-fast image conversion in Node.js with sharp: https://sharp.pixelplumbing.com/