How to set up a backup solution for your Mac with Docker Compose on a Raspberry Pi or similar, one that is in no way inferior to the original Apple Time Machine, is what I explain in this post.
Basics: backup vs. synchronisation
With the so-called Time Machine, Apple once again managed to make a service that was incredibly complicated to set up on other systems childishly easy to use. Unfortunately, data backups into the local network seem to have gone out of fashion, so Apple itself now only promotes backing up directly to USB storage or into its own iCloud. Both solutions have significant drawbacks. With the local backup I always have to remember to plug the external storage medium into the computer, and if, for example, a short circuit occurs while both devices are connected to each other, both are destroyed. The backup is gone exactly when you need it most. The alternatives iCloud and co. bring several drawbacks as well. For one thing, we entrust our data to an external provider that can promise us the data is stored safely and protected there, but no one can guarantee that. Moreover, iCloud and similar services are initially only file-synchronisation services, i.e. my data is stored in parallel locally and in the cloud. That also means: if I delete a file locally, the same happens in the cloud. And again goodbye, dear file backup. Counteracting this is file versioning, which can be enabled either by default or optionally. However, I myself have had the experience that this too fails precisely when you would need it.
For these and other reasons Apple has left one little "door" open and allows other manufacturers, e.g. of network storage devices such as QNAP, to integrate Time Machine into their hardware solutions, even though Apple itself no longer sells corresponding hardware.
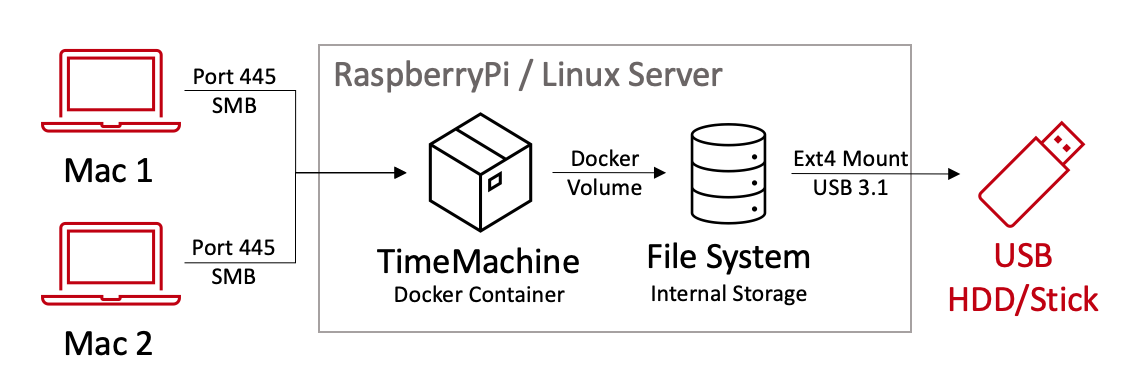
But if you already have a Linux server or Raspberry Pi with Docker Compose, as I do, it can be even simpler: we simply configure a container that serves as a Time Machine server on the home network!
Preparing the server
First we connect our external storage – I personally use an external hard drive – to our server. If that hasn't already happened, we format our storage in a filesystem native to Linux.
Formatting the disk
To format an external hard drive with the ext4 filesystem on the Linux command line, you can follow these steps:
- Connect the external hard drive to your computer. Make sure it is detected and has an assigned device path. You can check this with the lsblk command, which displays a list of block-based devices.
- Open a terminal or console to open the Linux command line.
- Enter the command sudo fdisk -l to display a list of detected hard drives and their partitions. Find the device path of your external hard drive in the list. It is usually labelled "/dev/sdX", where "X" stands for a letter (e.g. /dev/sdb).
- Make sure you select the correct device path and that the data on the drive is safely backed up. Formatting a drive irreversibly deletes all data on it.
- Enter the following command to change the disk format and create the ext4 filesystem:
sudo mkfs.ext4 /dev/sdXReplace "/dev/sdX" with the actual device path of your external hard drive.
- The command will ask you whether you want to proceed, since it will delete all data on the drive. Confirm with "y" and press Enter.
- The formatting process begins and may take some time depending on the size of the drive.
- Once the process is complete, you receive a confirmation message.
Your external hard drive should now be successfully formatted with the ext4 filesystem and ready for use under Linux.
Mounting the disk/storage permanently
Next we want to achieve that the storage or drive is automatically "mounted" – attached to the system – on every restart of the system.
To mount a drive formatted with ext4 in the /etc/fstab file, you can follow these steps:
- Open a terminal or console to open the Linux command line.
- Enter the command
sudo blkidto display a list of detected drives and their UUIDs. Find the UUID of your ext4-formatted drive in the list. The UUID looks roughly like this: UUID=xxxxxxxx-xxxx-xxxx-xxxx-xxxxxxxxxxxx. - Create a folder that will serve as the mount point for the drive. You can do this with the command sudo
mkdir <mountpoint>, whereis the path to the desired folder. For example: sudo mkdir /mnt/backup. - Open the /etc/fstab file in a text editor with root privileges. For example:
sudo nano /etc/fstab. - Add a new line at the end of the /etc/fstab file to mount the drive. The syntax is:
UUID=<UUID> <mountpoint> ext4 defaults 0 2. Replacewith the UUID of your drive and with the path to the folder you created earlier, e.g. UUID=xxxxxxxx-xxxx-xxxx-xxxx-xxxxxxxxxxxx /mnt/backup ext4 defaults 0 2. - Save the changes and close the text editor.
- To mount the drive immediately without restarting the computer, enter the command
sudo mount -a. This reads the entries in the /etc/fstab file and mounts the corresponding drives.
The drive is now automatically mounted every time the system starts, using the information in the /etc/fstab file. You can access the files and folders on the drive via the specified mount point.
Setting up the Docker container with Compose
If you haven't installed Docker and Docker Compose yet, the procedure is described here. We use the image mbentley/timemachine from Docker Hub to reproduce the Time Machine functionality the way providers of professional backup solutions do it too.
To start the Docker container "mbentley/timemachine:smb" with Docker Compose, create a compose.yml file with the appropriate configurations. Here is an example based on the image that defines a service for the container:
version: "3.3"
services:
  timemachine:
    image: mbentley/timemachine:smb
    container_name: timemachine
    hostname: timemachine
    restart: unless-stopped
    ports:
      - 137:137/udp
      - 138:138/udp
      - 139:139
      - 445:445
    logging:
      options:
        max-size: "10m"
        max-file: "3"
    environment:
      TZ: 'Europe/Berlin'
      CUSTOM_SMB_CONF: "false"
      CUSTOM_USER: "false"
      DEBUG_LEVEL: "1"
      HIDE_SHARES: "no"
      EXTERNAL_CONF: ""
      MIMIC_MODEL: "TimeCapsule8,119"
      TM_USERNAME: "timemachine"
      TM_GROUPNAME: "timemachine"
      TM_UID: "1000"
      TM_GID: "1000"
      PASSWORD: "DEINPASSWORT"
      SET_PERMISSIONS: "false"
      SHARE_NAME: "TimeMachine"
      SMB_INHERIT_PERMISSIONS: "no"
      SMB_NFS_ACES: "yes"
      SMB_PORT: "445"
      SMB_VFS_OBJECTS: "acl_xattr fruit streams_xattr"
      VOLUME_SIZE_LIMIT: "1 T"
      WORKGROUP: "WORKGROUP"
    volumes:
      - /mnt/backup/timemachine:/opt/timemachine
Save the file as compose.yml. This example uses port 445 for SMB access. It also binds the directory /mnt/backup/timemachine on the host to the directory /opt/timemachine in the container, so the backups are stored on the external drive.
Then run the following command to start the container: docker compose up -d. This starts the container in the background. The -d option ensures the service runs in the background (detached mode).
Now the container "mbentley/timemachine:smb" is running and reachable via the configured ports. You can then establish a Time Machine connection to your Docker host using the corresponding SMB protocol and use the directory /mnt/backup/timemachine to store your backups.
Configuring the backup on the Mac
We have now completed all the preparatory steps on our server and turn to the Mac that is to be backed up. My experience has been that a backup is easiest to set up if you first connect to the network drive on the server. To connect to an SMB drive on your Mac, follow these steps:
- Open Finder on your Mac.
- Click "Go" in the menu bar and choose "Connect to Server…" (or use the keyboard shortcut "Cmd + K").
- Enter the address of the SMB drive in the input field. The address can be either the server's IP address or its network name (if available). The address format is
smb://<address>. For example:smb://192.168.0.100orsmb://myserver. - Click "Connect".
- A dialog window appears in which you must enter your credentials. Enter the username and password for accessing the SMB drive as configured in the Docker Compose file. You also have the option of ticking the box "Save Password to Keychain" to store the credentials for future connections.
- Click "Connect".
- If the credentials are correct and access has been granted, the SMB drive appears in Finder. You can now access and edit the drive's files and folders.
After connecting, the SMB drive appears in the "Shares" section of Finder. You can also create a bookmark for the SMB drive by dragging it into the Finder sidebar. This simplifies access in the future.
If you want to disconnect, you can simply drag the SMB drive out of the Finder sidebar or right-click the drive and choose "Disconnect".
Please note that, for a successful connection, the SMB protocol must be enabled on the SMB drive and the Mac's network settings should be configured correctly.
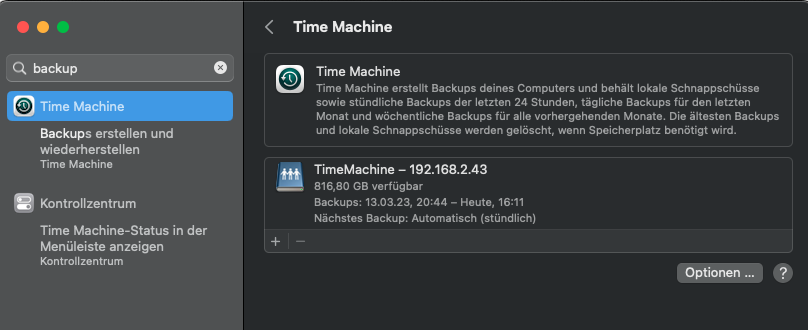
To set up a regular backup to network attached storage (NAS) under macOS, you can use Time Machine. Follow these steps:
- Make sure your network storage is properly connected to your network and accessible.
- Go to "System Settings" on your Mac and click "Time Machine".
- Click "Enable Time Machine".
- Click "More Options".
- Choose the option "Select Backup Disk".
- In Finder, select the network storage you want to use for the backup and click "Select".
- Time Machine will check and, if necessary, format the backup volume.
- Once the volume has been selected, return to the Time Machine settings.
- Enable the checkbox for "Automatically Back Up".
- You can also adjust the schedule for the backups by disabling the "Automatically Back Up" checkbox and then setting specific times at which backups should take place.
- You can also adjust the "Exclude" settings to exclude certain folders or files from backups.
Once you have completed the steps above, Time Machine will perform automatic backups on your network storage regularly. Note that the backup speed depends on the network connection and may take longer than with a directly attached storage device.
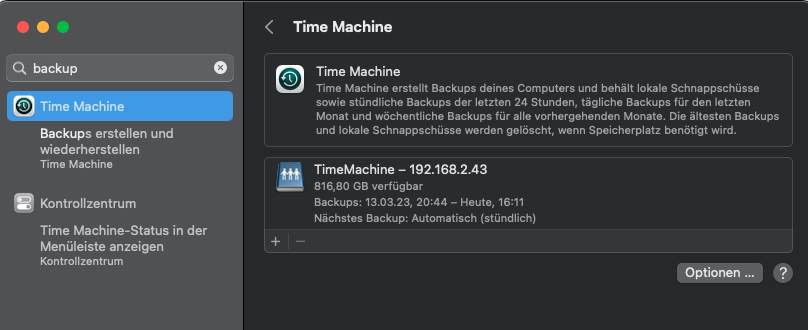
It is also important to ensure that the network storage is properly configured and compatible with the Mac in order to guarantee the best possible Time Machine support. Consult your NAS manufacturer's documentation for more information on setting up Time Machine support.